

Gardening in India, with its diverse climate, requires not just love and patience but also the right nourishment for your plants. Many Indian gardeners are turning towards organic and homemade solutions for a more sustainable and eco-friendly approach to gardening.
You drink beer, and eat garlic. (if not then you can borrow them).
Today, I’ll share an incredibly simple yet effective recipe for a blooming fertilizer using beer, garlic, and water that promises to make your garden vibrant with flowers. This concoction, utilizing everyday kitchen ingredients, is not only cost-effective but also environmentally friendly, making it a perfect choice for those looking to reduce their carbon footprint.
Let’s dive into the steps:
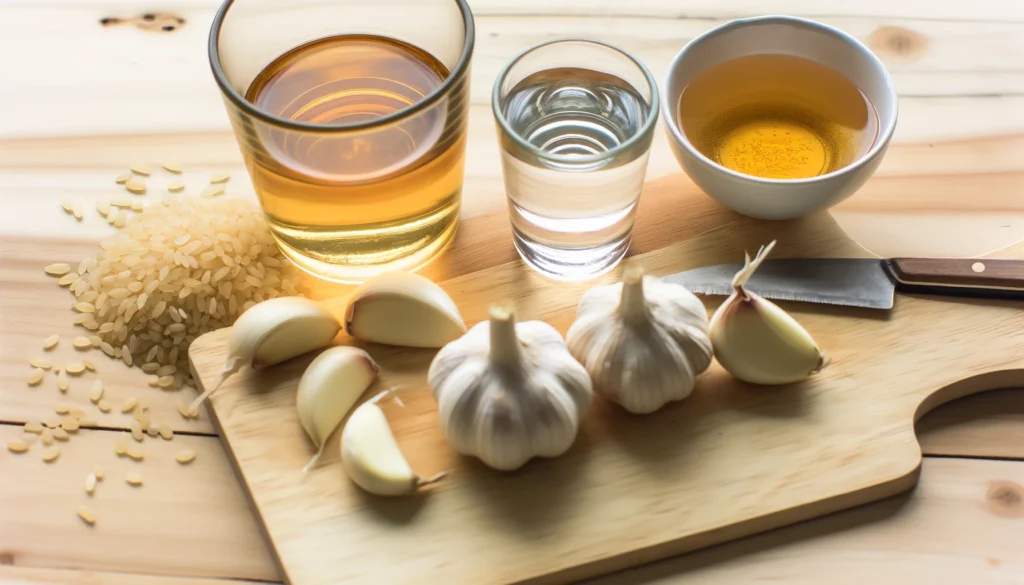
Ingredients and Tools
- 7-8 cloves of garlic
- 1 cup of beer
- 1 teaspoon of vinegar
- 1 cup of water
- 50 grams of rice
- A non-metallic container (plastic or ceramic)


Quick Action Steps for Homemade Blooming Fertilizer
- Crush 7-8 cloves of garlic slightly.
- In a non-metallic container, mix the crushed garlic, 1 cup of beer, 1 teaspoon of vinegar, and 50 grams of rice.
- Add 1 cup of water to the mixture.
- Cover the container and let it ferment in a warm place for 3-4 days.
- Strain the solution to remove solids.
- Dilute the strained liquid with 2 liters of water.
- Pour a cup of the diluted fertilizer into the soil around your plants every three weeks.
That’s it. Next time, don’t drink the whole beer alone, spare some for your plants, too. 🙂
Interested to know how it works?
Now, let’s dive into the detailed guide to understand the impact and benefits of each step.
Step 1: Prepare the Mixture
Start by slightly crushing the garlic cloves. This helps in releasing their natural compounds, which are beneficial for plant growth. In your chosen container, combine the crushed garlic, beer, vinegar, and rice. The beer acts as a natural fermenting agent, while vinegar adds essential acidity that helps in the breaking down process, making nutrients more accessible to plants.
Step 2: Fermentation
Add a cup of water to the mixture, ensuring all ingredients are fully submerged. Cover the container with a lid or a cloth to prevent contaminants but allow it to breathe. Store the container in a warm place for 3-4 days. During this period, the mixture will ferment, breaking down the ingredients into a potent liquid fertilizer.
Step 3: Straining the Solution
After the fermentation period, open the container and strain the solution to separate the liquid from the solids. The liquid now contains all the nutrients in a form that’s easily accessible to plants.
Step 4: Dilute the Fertilizer
Take the strained liquid and add two liters of water to it. This dilution is necessary to ensure the fertilizer is not too strong for the plants, which could potentially harm them. The resulting solution is your homemade blooming fertilizer, ready to encourage vibrant flower growth.
Step 5: Application
Pour a cup of the diluted fertilizer into the soil around your plants, preferably in the early morning or late evening to avoid evaporation. Repeat this process every two weeks, and you should start seeing a significant increase in blooming within your garden.
Why It Works
This homemade fertilizer is a powerhouse of nutrients essential for flowering. Garlic acts as a natural pest repellent, protecting your plants from harmful insects. Beer, rich in yeast, contributes essential nutrients like phosphorus, potassium, and nitrogen – all crucial for plant growth. Vinegar, with its acidic properties, helps in adjusting the soil’s pH levels, making it more conducive for nutrient uptake. Rice, on the other hand, is a great source of starch, supporting beneficial microorganisms in the soil.
By creating this natural fertilizer, you’re not only feeding your plants but also promoting a healthy, biodiverse ecosystem in your garden. This method is sustainable, eco-friendly, and particularly suitable for the Indian climate, where organic materials are readily available, and the warm weather accelerates the fermentation process.
Remember, gardening is not just about the beauty it brings to our homes but also the harmony it creates with nature. By using homemade fertilizers, you’re taking a step towards a more sustainable future, reducing chemical use, and fostering a healthier environment for us all.
Frequently Asked Questions
Why should I avoid using a metal container for the fermentation process?
Metal containers can react with the acidic ingredients, potentially contaminating your fertilizer. Stick to plastic or ceramic to ensure the purity of your concoction.
Can I use this fertilizer for all types of plants?
This fertilizer is particularly beneficial for flowering plants. However, it’s gentle enough for use with a wide variety of plants. Always monitor your plants for any adverse reactions.
How often should I apply this fertilizer?
During blooming season, you can use once in two weeks.
Is there an alternative to beer in this recipe?
Beer is used for its yeast content. If necessary, you can substitute beer with a yeast solution made from baking yeast dissolved in water.
Can I store the unused fertilizer?
It’s best used fresh, but you can store the diluted solution for up to a week in a cool, dark place. Stir well before using again.
Conclusion
Embracing organic gardening practices not only benefits your plants but also contributes to a healthier ecosystem. This homemade blooming fertilizer is a testament to what we can achieve with a little creativity and respect for nature. Give it a try and watch your garden transform into a blooming paradise.
Share with your friends and ask questions if you have any. Glad to be a help.
Neha – Bonsai Gardening by Abana Homes